Theming
To observe changes related to switching between light and dark mode in the app, ensure that the "Override force-dark" feature in the "developer options" settings on your Android device is not overridden.
Applying a theme to the whole app
To support custom themes, paper exports a PaperProvider component. You need to wrap your root component with the provider to be able to support themes:
import * as React from 'react';
import { PaperProvider } from 'react-native-paper';
import App from './src/App';

export default function Main() {
  return (
    <PaperProvider>
      <App />
    </PaperProvider>
  );
}
By default React Native Paper will apply the Material You theme (MD3) if no theme or version prop is passed to the PaperProvider.
Accessing theme properties
Use the built-in useTheme() hook to get access to the theme's variables:
import * as React from 'react';
import { useTheme } from 'react-native-paper';

export default function PaymentScreen() {
  const theme = useTheme();

  return <View style={{ backgroundColor: theme.colors.primary }} />;
}
You can also use the withTheme() HOC exported from the library. If you wrap your component with the HOC, you'll receive the theme as a prop:
import * as React from 'react';
import { withTheme } from 'react-native-paper';

function PaymentScreen({ theme }) {
  return <View style={{ backgroundColor: theme.colors.primary }} />;
}

export default withTheme(PaymentScreen);
Theme properties
You can change the theme prop dynamically and all the components will automatically update to reflect the new theme.
A theme usually contains the following properties:
dark(boolean): whether this is a dark theme or light theme.version: specify which design system components should follow in the app- 3 - new Material You (MD3)
- 2 - previous Material Design (MD2)
mode('adaptive' | 'exact'): color mode for dark theme (See Dark Theme).roundness(number): roundness of common elements, such as buttons.colors(object): various colors used throughout different elements.The primary key color is used to derive roles for key components across the UI, such as the FAB, prominent buttons, active states, as well as the tint of elevated surfaces.
primaryonPrimaryprimaryContaineronPrimaryContainer
The secondary key color is used for less prominent components in the UI such as filter chips, while expanding the opportunity for color expression.
secondaryonSecondarysecondaryContaineronSecondaryContainer
The tertiary key color is used to derive the roles of contrasting accents that can be used to balance primary and secondary colors or bring heightened attention to an element.
The tertiary color role is left for teams to use at their discretion and is intended to support broader color expression in products.
tertiaryonTertiarytertiaryContaineronTertiaryContainer
The neutral key color is used to derive the roles of surface and background, as well as high emphasis text and icons.
backgroundonBackgroundsurfaceonSurface
The neutral variant key color is used to derive medium emphasis text and icons, surface variants, and component outlines.
surfaceVariantonSurfaceVariantoutline
In addition to the accent and neutral key color, the color system includes a semantic color role for error
erroronErrorerrorContaineronErrorContainer
Surfaces at elevation levels 0-5 are tinted via color overlays based on the primary color, such as app bars or menus. The addition of a grade from 0-5 introduces tonal variation to the surface baseline.
elevation(object)level0- transparentlevel1- 5% opacitylevel2- 8% opacitylevel3- 11% opacitylevel4- 12% opacitylevel5- 14% opacity
Colors for disabled state
surfaceDisabledonSurfaceDisabled
These additional role mappings exist in a scheme and are mapped to components where needed.
shadowinverseOnSurfaceinverseSurfaceinversePrimarybackdrop
fonts(object): various fonts styling properties under the text variant key used in component.- [
variante.g.labelMedium] (object):fontFamilyletterSpacingfontWeightlineHeightfontSize
- [
animation(object)scale- scale for all animations
When creating a custom theme, you will need to provide all of these properties.
If you don't use a custom theme, Paper will automatically turn animations on/off, depending on device settings.
Otherwise, your custom theme will need to handle it manually, using React Native's AccessibilityInfo API.
Extending the theme
Keeping your own properties in the theme is fully supported by our library:
import * as React from 'react';
import {
  MD3LightTheme as DefaultTheme,
  PaperProvider,
} from 'react-native-paper';
import App from './src/App';

const theme = {
  ...DefaultTheme,
  // Specify custom property
  myOwnProperty: true,
  // Specify custom property in nested object
  colors: {
    ...DefaultTheme.colors,
    myOwnColor: '#BADA55',
  },
};

export default function Main() {
  return (
    <PaperProvider theme={theme}>
      <App />
    </PaperProvider>
  );
}
Creating dynamic theme colors
Dynamic Color Themes allows for generating two color schemes lightScheme and darkScheme, based on the provided source color. Created schemes are following the Material Design 3 color system and covering colors structure from the Paper theme. User may generate these schemes using the following tool:
| Primary | |
| Secondary | |
| Tertiary | |
Preview
Dark Mode:
Light theme
{
  "colors": {
    "primary": "rgb(120, 69, 172)",
    "onPrimary": "rgb(255, 255, 255)",
    "primaryContainer": "rgb(240, 219, 255)",
    "onPrimaryContainer": "rgb(44, 0, 81)",
    "secondary": "rgb(102, 90, 111)",
    "onSecondary": "rgb(255, 255, 255)",
    "secondaryContainer": "rgb(237, 221, 246)",
    "onSecondaryContainer": "rgb(33, 24, 42)",
    "tertiary": "rgb(128, 81, 88)",
    "onTertiary": "rgb(255, 255, 255)",
    "tertiaryContainer": "rgb(255, 217, 221)",
    "onTertiaryContainer": "rgb(50, 16, 23)",
    "error": "rgb(186, 26, 26)",
    "onError": "rgb(255, 255, 255)",
    "errorContainer": "rgb(255, 218, 214)",
    "onErrorContainer": "rgb(65, 0, 2)",
    "background": "rgb(255, 251, 255)",
    "onBackground": "rgb(29, 27, 30)",
    "surface": "rgb(255, 251, 255)",
    "onSurface": "rgb(29, 27, 30)",
    "surfaceVariant": "rgb(233, 223, 235)",
    "onSurfaceVariant": "rgb(74, 69, 78)",
    "outline": "rgb(124, 117, 126)",
    "outlineVariant": "rgb(204, 196, 206)",
    "shadow": "rgb(0, 0, 0)",
    "scrim": "rgb(0, 0, 0)",
    "inverseSurface": "rgb(50, 47, 51)",
    "inverseOnSurface": "rgb(245, 239, 244)",
    "inversePrimary": "rgb(220, 184, 255)",
    "elevation": {
      "level0": "transparent",
      "level1": "rgb(248, 242, 251)",
      "level2": "rgb(244, 236, 248)",
      "level3": "rgb(240, 231, 246)",
      "level4": "rgb(239, 229, 245)",
      "level5": "rgb(236, 226, 243)"
    },
    "surfaceDisabled": "rgba(29, 27, 30, 0.12)",
    "onSurfaceDisabled": "rgba(29, 27, 30, 0.38)",
    "backdrop": "rgba(51, 47, 55, 0.4)"
  }
}
Dark theme
{
  "colors": {
    "primary": "rgb(220, 184, 255)",
    "onPrimary": "rgb(71, 12, 122)",
    "primaryContainer": "rgb(95, 43, 146)",
    "onPrimaryContainer": "rgb(240, 219, 255)",
    "secondary": "rgb(208, 193, 218)",
    "onSecondary": "rgb(54, 44, 63)",
    "secondaryContainer": "rgb(77, 67, 87)",
    "onSecondaryContainer": "rgb(237, 221, 246)",
    "tertiary": "rgb(243, 183, 190)",
    "onTertiary": "rgb(75, 37, 43)",
    "tertiaryContainer": "rgb(101, 58, 65)",
    "onTertiaryContainer": "rgb(255, 217, 221)",
    "error": "rgb(255, 180, 171)",
    "onError": "rgb(105, 0, 5)",
    "errorContainer": "rgb(147, 0, 10)",
    "onErrorContainer": "rgb(255, 180, 171)",
    "background": "rgb(29, 27, 30)",
    "onBackground": "rgb(231, 225, 229)",
    "surface": "rgb(29, 27, 30)",
    "onSurface": "rgb(231, 225, 229)",
    "surfaceVariant": "rgb(74, 69, 78)",
    "onSurfaceVariant": "rgb(204, 196, 206)",
    "outline": "rgb(150, 142, 152)",
    "outlineVariant": "rgb(74, 69, 78)",
    "shadow": "rgb(0, 0, 0)",
    "scrim": "rgb(0, 0, 0)",
    "inverseSurface": "rgb(231, 225, 229)",
    "inverseOnSurface": "rgb(50, 47, 51)",
    "inversePrimary": "rgb(120, 69, 172)",
    "elevation": {
      "level0": "transparent",
      "level1": "rgb(39, 35, 41)",
      "level2": "rgb(44, 40, 48)",
      "level3": "rgb(50, 44, 55)",
      "level4": "rgb(52, 46, 57)",
      "level5": "rgb(56, 49, 62)"
    },
    "surfaceDisabled": "rgba(231, 225, 229, 0.12)",
    "onSurfaceDisabled": "rgba(231, 225, 229, 0.38)",
    "backdrop": "rgba(51, 47, 55, 0.4)"
  }
}
Passed source color into the util is translated into tones to automatically provide the range of tones that map to color roles.
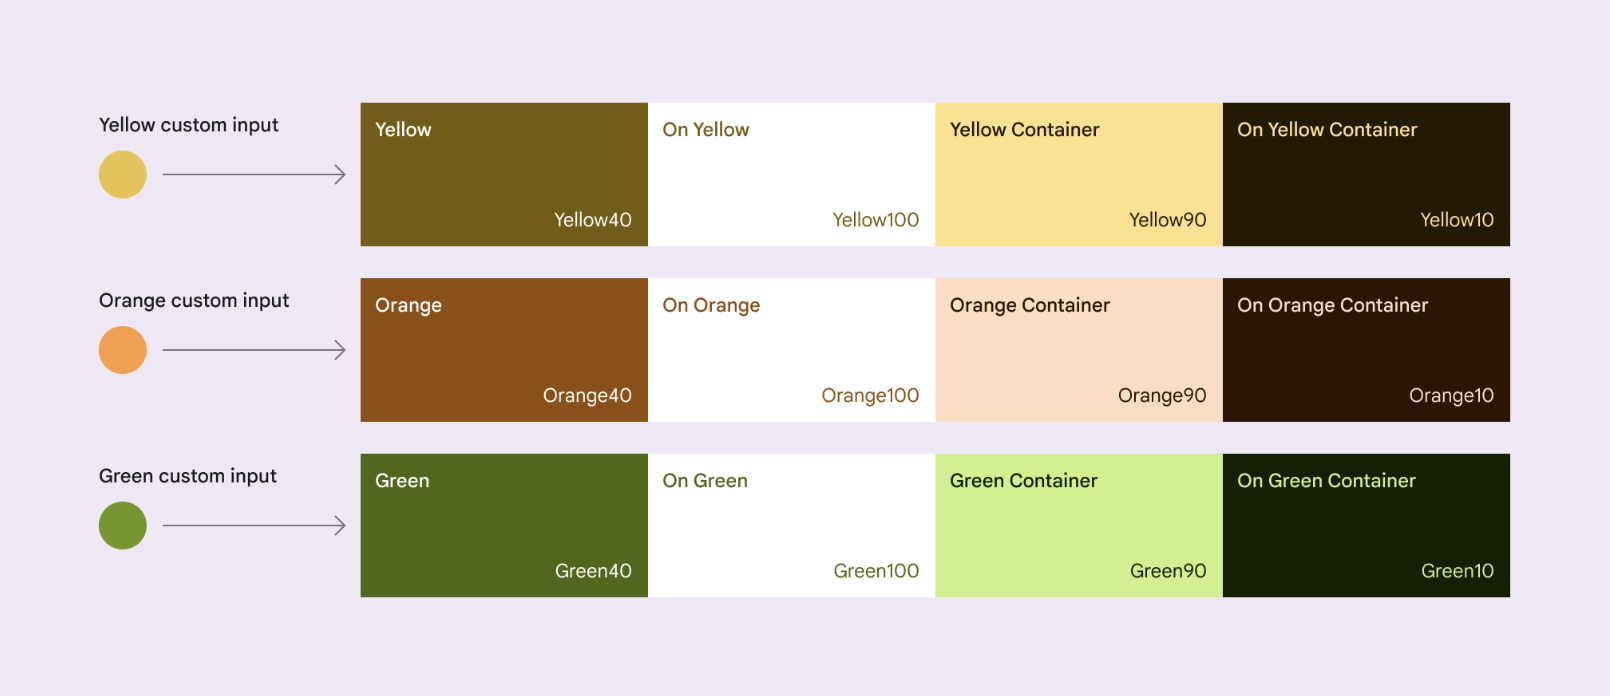
Source: Material You Color System
Using schemes
Once we have copied the color schemes from the generated JSON above, we can use by passing it to the colors in theme object as below:
import * as React from 'react';
import {
  MD3LightTheme as DefaultTheme,
  PaperProvider,
} from 'react-native-paper';
import App from './src/App';

const theme = {
  ...DefaultTheme,
  colors: yourGeneratedLightOrDarkScheme.colors, // Copy it from the color codes scheme and then use it here
};

export default function Main() {
  return (
    <PaperProvider theme={theme}>
      <App />
    </PaperProvider>
  );
}
Sync dynamic colors with system colors
Using pchmn/expo-material3-theme library you can easily access the Material 3 system colors from Android 12+ devices and seamlessly integrate them into your dynamic theme. Any changes made by the user to the system colors will be automatically reflected in the theme.
In case of incompatible devices, the library will revert to a default theme.
To get started, follow the installation instructions and check the following code:
import { useMaterial3Theme } from '@pchmn/expo-material3-theme';
import { useColorScheme } from 'react-native';
import { MD3DarkTheme, MD3LightTheme, PaperProvider } from 'react-native-paper';
import App from './src/App';

export default function Main() {
  const colorScheme = useColorScheme();
  const { theme } = useMaterial3Theme();

  const paperTheme =
    colorScheme === 'dark'
      ? { ...MD3DarkTheme, colors: theme.dark }
      : { ...MD3LightTheme, colors: theme.light };

  return (
    <PaperProvider theme={paperTheme}>
      <App />
    </PaperProvider>
  );
}
Adapting React Navigation theme
The adaptNavigationTheme function takes an existing React Navigation theme and returns a React Navigation theme using the colors from Material Design 3. This theme can be passed to NavigationContainer so that React Navigation's UI elements have the same color scheme as Paper.
adaptNavigationTheme(themes);
For users of react-navigation version 7.0.0 and above, adaptNavigationTheme overrides the fonts from the navigation theme as follows:
fonts: {
  regular: {
    fontFamily: materialTheme.fonts.bodyMedium.fontFamily,
    fontWeight: materialTheme.fonts.bodyMedium.fontWeight,
    letterSpacing: materialTheme.fonts.bodyMedium.letterSpacing,
  },
  medium: {
    fontFamily: materialTheme.fonts.titleMedium.fontFamily,
    fontWeight: materialTheme.fonts.titleMedium.fontWeight,
    letterSpacing: materialTheme.fonts.titleMedium.letterSpacing,
  },
  bold: {
    fontFamily: materialTheme.fonts.headlineSmall.fontFamily,
    fontWeight: materialTheme.fonts.headlineSmall.fontWeight,
    letterSpacing: materialTheme.fonts.headlineSmall.letterSpacing,
  },
  heavy: {
    fontFamily: materialTheme.fonts.headlineLarge.fontFamily,
    fontWeight: materialTheme.fonts.headlineLarge.fontWeight,
    letterSpacing: materialTheme.fonts.headlineLarge.letterSpacing,
  },
}
| NAME | TYPE |
|---|---|
| themes | object |
Valid themes keys are:
reactNavigationLight() - React Navigation compliant light theme.reactNavigationDark() - React Navigation compliant dark theme.materialLight() - React Native Paper compliant light theme.materialDark() - React Native Paper compliant dark theme.
// App.tsx
import { NavigationContainer, DefaultTheme } from '@react-navigation/native';
import { createStackNavigator } from '@react-navigation/stack';
import {
  PaperProvider,
  MD3LightTheme,
  adaptNavigationTheme,
} from 'react-native-paper';
const Stack = createStackNavigator();
const { LightTheme } = adaptNavigationTheme({
  reactNavigationLight: DefaultTheme,
});
export default function App() {
  return (
    <PaperProvider theme={MD3LightTheme}>
      <NavigationContainer theme={LightTheme}>
        <Stack.Navigator initialRouteName="Home">
          <Stack.Screen name="Home" component={HomeScreen} />
          <Stack.Screen name="Details" component={DetailsScreen} />
        </Stack.Navigator>
      </NavigationContainer>
    </PaperProvider>
  );
}
TypeScript
By default, TypeScript works well whenever you change the value of the built-in theme's properties. It gets more complicated when you want to extend the theme's properties or change their types. In order to fully support TypeScript, you will need to follow the guide that fits your use-case most accurately:
There are two supported ways of overriding the theme:
- Simple built-in theme overrides - when you only customize the values and the whole theme schema remains the same
- Advanced theme overrides - when you add new properties or change the built-in schema shape
TypeScript support for withTheme is currently limited to Material You (MD3) theme only.
Simple built-in theme overrides
You can provide a theme prop with a theme object with the same properties as the default theme:
import * as React from 'react';
import { MD3LightTheme, PaperProvider } from 'react-native-paper';
import App from './src/App';

const theme = {
  ...MD3LightTheme, // or MD3DarkTheme
  roundness: 2,
  colors: {
    ...MD3LightTheme.colors,
    primary: '#3498db',
    secondary: '#f1c40f',
    tertiary: '#a1b2c3',
  },
};

export default function Main() {
  return (
    <PaperProvider theme={theme}>
      <App />
    </PaperProvider>
  );
}
Advanced theme overrides
If you need to modify the built-in theme schema by adding a new property or changing its type, you need to follow these steps:
- Pass your theme overrides to the PaperProvider component
import * as React from 'react';
import { MD3LightTheme, PaperProvider } from 'react-native-paper';
import App from './src/App';

const theme = {
  ...MD3LightTheme,

  // Specify a custom property
  custom: 'property',

  // Specify a custom property in nested object
  colors: {
    ...MD3LightTheme.colors,
    brandPrimary: '#fefefe',
    brandSecondary: 'red',
  },
};

export default function Main() {
  return (
    <PaperProvider theme={theme}>
      <App />
    </PaperProvider>
  );
}
- Create a typed
useAppTheme()hook in your project
import * as React from 'react';
import { MD3LightTheme, PaperProvider, useTheme } from 'react-native-paper';
import App from './src/App';

const theme = {
  ...MD3LightTheme,

  // Specify a custom property
  custom: 'property',

  // Specify a custom property in nested object
  colors: {
    ...MD3LightTheme.colors,
    brandPrimary: '#fefefe',
    brandSecondary: 'red',
  },
};

export type AppTheme = typeof theme;

export const useAppTheme = () => useTheme<AppTheme>();

export default function Main() {
  return (
    <PaperProvider theme={theme}>
      <App />
    </PaperProvider>
  );
}
- Start using the
useAppTheme()hook across your components in the whole app
import * as React from 'react';
import { useAppTheme } from './App';

export default function HomeScreen() {
  const {
    colors: { brandPrimary },
  } = useAppTheme();

  return <View style={{ backgroundColor: brandPrimary }}>...</View>;
}
Material Design 2
Using Material Design 2 is fully supported in React Native Paper v5.x.
Simple setup
In order to use the Material Design 2 theme you can just pass { version: 2 } to the PaperProvider theme prop:
import * as React from 'react';
import { PaperProvider } from 'react-native-paper';
import App from './src/App';

export default function Main() {
  return (
    <PaperProvider theme={{ version: 2 }}>
      <App />
    </PaperProvider>
  );
}
Specifying { version: 2 } tells React Native Paper to use the built in Material Design 2 theme, so you don't have to fully extend it on your own.
Advanced setup
As with any theme, you can also specify your custom properties within the Material Design 2 theme:
import * as React from 'react';
import { MD2LightTheme, PaperProvider } from 'react-native-paper';
import App from './src/App';

export default function Main() {
  const theme = {
    ...MD2LightTheme,

    // Specify a custom property
    custom: 'property',

    // Specify a custom nested property
    colors: {
      ...MD2LightTheme.colors,
      primary: '#fefefe',
    },
  };

  return (
    <PaperProvider theme={theme}>
      <App />
    </PaperProvider>
  );
}
Typescript
Due to the amount of changes in the theme's schema shape it falls into the Advanced theme overrides category. The steps are identical as with any advanced theme, just make sure to extend the built-in MD2LightTheme or MD2DarkTheme instead of MD3LightTheme or MD3DarkTheme.
The final example for Material Design 2 would look like this:
import * as React from 'react';
import { MD2LightTheme, PaperProvider, useTheme } from 'react-native-paper';
import App from './src/App';

const theme = {
  // Extend Material Design 2 theme

  ...MD2LightTheme, // or MD2DarkTheme

  // Specify a custom property
  myOwnProperty: true,

  // Specify a custom nested property
  colors: {
    ...MD2LightTheme.colors,
    myOwnColor: '#BADA55',
  },
};

export type AppTheme = typeof theme;

export const useAppTheme = () => useTheme<AppTheme>();

export default function Main() {
  return (
    <PaperProvider theme={theme}>
      <App />
    </PaperProvider>
  );
}

// App.tsx

export default function App() {
  const { theme } = useAppTheme();

  return <View style={{ backgroundColor: theme.colors.primary }} />;
}
Migrating to Material You
If you are migrating from Material Design 2 (4.x and lower) to Material You (5.x), please refer to our Migration Guide
Applying a theme to a paper component
If you want to change the theme for a certain component from the library, you can directly pass the theme prop to the component. The theme passed as the prop is merged with the theme from the PaperProvider:
import * as React from 'react';
import { Button } from 'react-native-paper';

export default function ButtonExample() {
  return (
    <Button raised theme={{ roundness: 3 }}>
      Press me
    </Button>
  );
}
Customizing all instances of a component
Sometimes you want to style a component in a different way everywhere, but don't want to change the properties in the theme, so that other components are not affected. For example, say you want to change the font for all your buttons, but don't want to change theme.fonts.labelLarge because it affects other components.
We don't have an API to do this, because you can already do it with components:
import * as React from 'react';
import { Button } from 'react-native-paper';

export default function FancyButton(props) {
  return (
    <Button
      theme={{ typescale: { labelLarge: { letterSpacing: 1 } } }}
      {...props}
    />
  );
}
Now you can use your FancyButton component everywhere instead of using Button from Paper.
Dark Theme
Since 3.0 we adapt dark theme to follow Material design guidelines.
In contrast to light theme, dark theme by default uses surface colour instead of primary on large components like AppBar or BottomNavigation.
The dark theme adds a white overlay with opacity depending on elevation of surfaces. It uses it for the better accentuation of surface elevation. Using only shadow is highly imperceptible on dark surfaces.
We are aware that users often use dark theme in their own ways and may not want to use the default dark theme features from the guidelines.
That's why if you are using dark theme you can switch between two dark theme modes:
exactwhere everything is like it was before.AppbarandBottomNavigationwill still use primary colour by default.adaptivewhere we follow Material design guidelines, the surface will use white overlay with opacity to show elevation,AppbarandBottomNavigationwill use surface colour as a background.
If you don't use a custom theme, Paper will automatically change between the default theme and the default dark theme, depending on device settings.
Otherwise, your custom theme will need to handle it manually, using React Native's Appearance API.
Gotchas
The PaperProvider exposes the theme to the components via React's context API, which means that the component must be in the same tree as the PaperProvider. Some React Native components will render a different tree such as a Modal, in which case the components inside the Modal won't be able to access the theme. The work around is to get the theme using the withTheme HOC and pass it down to the components as props, or expose it again with the exported ThemeProvider component.
The Modal component from the library already handles this edge case, so you won't need to do anything.